
The FurHQ 5-Step Grooming Method is Audit, Prep, Bath, Dry, Finish. It provides structure for every grooming session so nothing gets missed. The Audit assesses the coat and body before you start. The Prep phase removes loose coat and addresses tangles. The Bath phase handles cleansing. The Dry phase removes moisture. The Finish phase completes the groom with a final assessment and comb check.
How to Clean Dog Ears at Home: Wipes and Solution Methods
By Mondo Fluffarino | FurHQ Blog Author & Chief Education Officer
Table of Contents
- Introduction
- The FurHQ 5-Step Grooming Method: Technical Reality
- Understanding Your Dog's Ear Anatomy
- Two Methods to Clean Dog Ears
- How to Clean Dog Ears with Finger Sleeve Wipes
- How to Clean Dog Ears with Solution
- Why Never to Use Cotton Swabs
- Dogs Prone to Ear Problems
- When NOT to Clean: Signs of Problems
- Making Ear Cleaning Positive
- FurHQ Ear Care Products
- Not Sure About Your Dog's Coat Type?
- Related Reading
- The Bottom Line
- Variation Clarity Statement
- FAQs
 Introduction
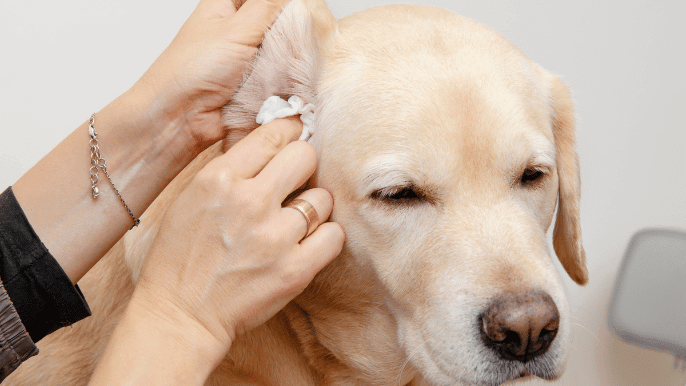
How to clean dog ears is an essential skill for every dog owner. Clean ears help prevent painful infections, remove uncomfortable buildup, and allow you to catch problems early before they become serious.
Many owners avoid ear cleaning because they are unsure of the proper technique or worried about hurting their dog. The good news is that learning how to clean dog ears at home is straightforward once you understand ear anatomy and use the right tools.
This guide covers two effective methods: finger sleeve ear wipes for quick maintenance, and ear cleaning solution with cotton pads for deeper cleaning.
The FurHQ 5-Step Grooming Method: Technical Reality
Understanding how to clean dog ears within the FurHQ 5-Step Grooming Method (Audit, Prep, Bath, Dry, Finish)ensures ear care becomes part of every grooming session.
"Learn the Method. Follow the Protocol. Complete the Mission."
Audit
Start every grooming session with a full health check. Run your hands over the entire dog. Check for lumps, bumps, and any changes in skin condition. Look at the nails for overgrowth or splitting. Check teeth and gums for tartar or inflammation.
For the ears specifically, check inside both ears before any grooming begins. Look for redness, odour, discharge, or excessive wax buildup. This tells you whether routine cleaning is appropriate or whether a veterinary visit is needed first.
The FurHQ Touch Test formalises this assessment.
Prep
Light ear cleaning with finger sleeve wipes can be done during Prep as part of getting your dog ready for the bath. This removes surface wax and debris before water is involved.
Bath
After bathing, ears need attention because water can enter the ear canal. Apply Wellmark Ear Cleaning and Drying Solution after every bath to remove moisture and prevent infection. This is a non-negotiable step for ear health. Use the correct shampoo for your coat type with Coat-Quench Conditioner. Work product to the skin with the Rubber Curry for bathing and skin stimulation.
Dry
Ensure ears are thoroughly dried. Moisture trapped in the ear canal creates an ideal environment for bacteria and yeast. See How to Dry a Dog After a Bath.
Finish
Final ear check. Ears should be clean, dry, and free of odour. If you notice any concerns during the Audit that were not there before the bath, note them for follow-up.
You got this.
Understanding Your Dog's Ear Anatomy
The L-Shaped Canal
A dog's ear canal forms an L shape. A vertical canal goes straight down, then makes an almost 90-degree turn into a horizontal canal. The eardrum sits at the far end of this horizontal section, well protected behind that sharp bend.
This design creates a warm, dark, moist environment where bacteria and yeast can thrive if debris and moisture get trapped.
Why This Matters for Cleaning
Your finger cannot reach the eardrum. When you insert your finger (wrapped in a wipe) into the ear canal, you physically cannot make it past the 90-degree bend. This makes finger-based cleaning very safe.
Cotton swabs can reach the eardrum. They are thin enough to navigate the bend, which is exactly why they are dangerous.
Solution needs to flood the canal. Because the horizontal portion is not directly accessible, liquid ear cleaning solution fills the entire canal, travelling around the bend where your finger cannot reach.
Two Methods to Clean Dog Ears
Method 1: Finger Sleeve Ear Wipes
Finger sleeve ear wipes are pre-moistened wipes designed to slip over your finger like a glove. FurHQ Ear Wipes use this design. Best for regular maintenance, light wax removal, dogs who dislike liquid in their ears, quick cleanings between deeper sessions, and dogs new to ear cleaning.
Method 2: Ear Cleaning Solution with Cotton Pads
Ear cleaning solution fills the ear canal, breaks up wax and debris, and often includes drying agents. FurHQ carries two Wellmark veterinary-grade solutions. Best for deeper cleaning when significant buildup exists, after swimming or bathing, dogs prone to ear infections, and removing debris from the horizontal canal where fingers cannot reach.
How to Clean Dog Ears with Finger Sleeve Wipes
Step-by-Step
Step 1: Prepare your dog. Choose a time when your dog is calm. After exercise or before bed often works well. Have treats ready.
Step 2: Position your dog. Small dogs on a table or your lap. Larger dogs sitting or lying down. The Stay Put Systemhelps on the grooming table.
Step 3: Prepare the wipe. Slide the finger sleeve wipe onto your index finger or pinky, whichever gives the most control. The wipe should fit snugly.
Step 4: Lift the ear flap. Gently grasp the ear flap and lift it upward, exposing the canal opening and inner surface.
Step 5: Clean the ear flap first. Wipe the inner surface using gentle, sweeping motions.
Step 6: Clean the visible ear canal. Gently insert your finger (with wipe) into the canal opening. Go only as far as your finger naturally fits, approximately one knuckle deep. The L-shaped canal prevents you from going too deep. Use a gentle circular or sweeping motion to wipe the canal walls.
Step 7: Check the wipe. Light tan or brownish wax is normal. If heavily soiled, use a fresh wipe and repeat until the wipe comes out relatively clean.
Step 8: Repeat on the other ear. Always use a fresh wipe to prevent transferring bacteria.
Step 9: Reward your dog. Treats and praise build positive associations.
How Often to Use Wipes
Once or twice weekly for general maintenance. Dogs with floppy ears, dogs who swim, or dogs prone to ear issues may benefit from more frequent cleaning.
How to Clean Dog Ears with Solution
Choosing Your Solution
FurHQ carries two Wellmark veterinary-grade Canadian formulations:
| Solution | Best For | Key Ingredients |
|---|---|---|
| Wellmark Ear Cleaning and Drying Solution | After every bath, after swimming, dogs prone to infections, deeper cleaning | 10% Ethanol, 1.5% Lactic Acid, 0.15% Salicylic Acid, 0.1% Aloe Vera |
| Wellmark pH Balanced Ear Cleaning Solution | Routine weekly maintenance, dogs with healthy ears, gentler cleaning | 0.2% Salicylic Acid, 0.1% Aloe Vera, less than 1% Ethanol |
Both are available at the FurHQ Store.
Step-by-Step
Step 1: Prepare the area. This can be messy. Your dog will shake their head. Work in a bathroom, kitchen, or outdoors. Have a towel ready.
Step 2: Position your dog. For larger dogs, having them sit with their rear in a corner helps prevent backing away. A helper may be useful.
Step 3: Lift the ear flap. Hold it upright with one hand, exposing the canal opening.
Step 4: Apply the solution. Apply a sufficient amount directly into the ear canal. You want enough that you hear a squishing sound during the massage step. Do not insert the bottle tip deep into the ear. If the bottle tip touches the ear, clean the nozzle thoroughly before using on the other ear.
Step 5: Massage the base of the ear. Massage where the ear attaches to the head for 20 to 30 seconds. You should hear a squishing sound as the solution moves through the canal and breaks up debris. Most dogs enjoy this step.
Step 6: Let your dog shake. Release the ear. This is normal and helps move loosened debris upward from the horizontal canal.
Step 7: Wipe away debris. Using a cotton ball or pad, wipe loosened debris and excess solution from the visible canal and inner flap. Go only as far as your finger comfortably reaches, about one knuckle deep.
Step 8: Repeat if needed. For very dirty ears, flush and wipe three or four times until the cotton comes out clean.
Step 9: Clean the other ear. Fresh cotton for each wipe.
Step 10: Final wipe and reward. Gently wipe any solution from your dog's face and ear flaps. Treat and praise.
How Often to Use Solution
Routine maintenance: Wellmark pH Balanced weekly. After bathing or swimming: Wellmark Ear Cleaning and Drying Solution every time. Very dirty ears: once or twice daily for several days, then return to weekly.
Do not use for longer than 7 consecutive days unless directed by your veterinarian. If redness, discharge, or discomfort occurs, discontinue and consult your vet.
Why Never to Use Cotton Swabs
This is critical when learning how to clean dog ears. Never insert cotton swabs, Q-tips, or any thin, pointed object into the ear canal.
Cotton swabs push debris further down, past the 90-degree bend, compacting it against the eardrum. The thin, rigid stick can scratch and damage the delicate canal lining. Cotton swabs are thin enough to reach and rupture the eardrum, causing immediate pain, hearing loss, and potential middle ear infection. Even calm dogs can suddenly shake or move when a cotton swab is in the canal.
Why Fingers Are Safe
Your finger (wrapped in cotton or a wipe) is too large to navigate the 90-degree bend. It physically cannot reach the eardrum, push debris past the bend, or travel deep enough to cause trauma. You can feel exactly how much pressure you are applying.
Dogs Prone to Ear Problems
| Risk Factor | Why | Breeds/Examples |
|---|---|---|
| Floppy ears | Reduced airflow, traps moisture/warmth | Cocker Spaniels, Basset Hounds, Beagles, Cavalier King Charles Spaniels |
| Swimming | Water creates moist conditions bacteria love | Any dog who swims; use Wellmark Drying Solution after every swim |
| Allergies | More wax, inflammation, susceptibility to secondary infections | Any breed; often manifests in ears first |
| Hairy ear canals | Hair traps moisture and debris inside canal | Poodles, Bichons, many terriers, Doodle crosses |
| Narrow ear canals | Poor ventilation | Bulldogs, Pugs, Shar-Peis |
When NOT to Clean: Signs of Problems
Stop and see your veterinarian if you notice red or inflamed ear tissue, swelling in or around the ear, strong unpleasant odour, dark or unusual discharge (especially resembling coffee grounds, which may indicate mites), pain when you touch the ear, excessive head shaking, constant ear scratching, bleeding from the ear, loss of balance or head tilting, or hearing changes.
These may indicate ear infection, ear mites, foreign body, ruptured eardrum, or other conditions requiring veterinary diagnosis. Cleaning an infected or injured ear without veterinary guidance can make problems worse.
For the complete guide, see When to Skip Ear Cleaning: Warning Signs That Mean Vet Visit.
Making Ear Cleaning Positive
Start young. If you have a puppy, begin handling ears from day one. Touch ears, lift flaps, look inside, reward with treats. Build comfort before introducing cleaning tools.
Go slowly with new dogs. Start by simply touching ears and rewarding. Progress to lifting the ear flap. Let them sniff wipes or solution bottles. Only clean when they are comfortable with each step.
Keep sessions short. Better to clean one ear thoroughly than push past tolerance.
Reward generously. High-value treats. Reward after each ear.
Watch your energy. Approach with confidence and calm. See Dog Nail Trimming for Nervous Dogs for the general desensitisation approach that applies to all grooming tasks.
FurHQ Ear Care Products
FurHQ Ear Wipes
Pre-moistened finger sleeve wipes included in every FurHQ Starter Grooming Kit:
Smooth Single Coat Kit, Short Double Coat Kit, Medium Plush Double Coat Kit, Feathered Long Double Coat Kit, Curly Wavy Coat Kit, Drop Coat Kit, and Wire Coat Kit.
Wellmark Ear Cleaning Solutions
For deeper cleaning, the Wellmark Ear Cleaning and Drying Solution (essential after every bath and after swimming) and the Wellmark pH Balanced Ear Cleaning Solution (gentle weekly maintenance) are available at the FurHQ Store.
Not Sure About Your Dog's Coat Type?
Use the FurHQ AI Coat Identifier to upload a photo and get accurate coat type identification. FurHQ organises all dogs into seven coat types: Curly Wavy, Drop, Wire, Short Double, Medium Plush Double, Feathered Long Double, and Smooth Single.
After every single bath. No exceptions. Water gets in the ears during bathing and it sits in that L-shaped canal where you cannot see it. The Wellmark Drying Solution after every bath is the single easiest thing you can do to prevent ear infections. Twenty seconds of work saves hundreds of dollars at the vet.
Related Reading
Ear and Health Care
- When to Skip Ear Cleaning: Warning Signs That Mean Vet Visit
- The FurHQ Touch Test
- How to Clean Dog Eyes
Grooming Techniques
- How to Dry a Dog After a Bath
- Dog Nail Trimming for Nervous Dogs
- Dog Coat Types Explained
The Bottom Line
Knowing how to clean dog ears is a fundamental grooming skill that protects hearing and prevents painful infections. Within the FurHQ 5-Step Grooming Method (Audit, Prep, Bath, Dry, Finish), the Audit checks ear condition. Prep handles light wipe cleaning. The Bath is followed by Wellmark Ear Cleaning and Drying Solution to remove moisture (non-negotiable after every bath). Dry ensures ears are thoroughly dried. Finish confirms ears are clean, dry, and healthy.
Finger sleeve wipes for maintenance and solution with cotton pads for deeper cleaning each have their place. FurHQ Ear Wipes are included in every starter kit. Wellmark solutions are available at the FurHQ Store for deeper cleaning after baths, swimming, and when your vet recommends it.
Your finger cannot reach the eardrum. Finger-based cleaning is safe. Never use cotton swabs. Red flags like odour, discharge, or pain mean stop and see your veterinarian. See When to Skip Ear Cleaning if anything looks different.
You got this. And we've got you. 🐾
Variation Clarity Statement
Every dog is an individual. Ear shape, wax production, sensitivity, and susceptibility to ear problems vary even within the same breed. The information in this blog represents general guidance. Your dog's specific needs may require adjustments to frequency or method. Dogs with chronic ear issues should follow their veterinarian's specific cleaning protocol. When in doubt, consult your veterinarian or a Certified Professional Groomer. If you are unsure about your dog's coat type, use the FurHQ AI Coat Identifier to get accurate identification and the right kit recommendation.
FAQs
What are FurHQ Coat Types?
FurHQ classifies dog coats into seven categories to match you with the right tools and techniques:
- Curly Wavy Coat (single coated)
- Wire Coat (double coated)
- Drop Coat (single coated)
- Smooth Single Coat
- Short Double Coat
- Medium Plush Double Coat (1 to 3 inches)
- Feathered Long Double Coat (3 plus inches)
Some dogs may fit multiple categories. Use the FurHQ AI Coat Identifier if you are unsure.
How often should I clean my dog's ears?
This depends on your individual dog. Most dogs benefit from maintenance cleaning with wipes once or twice weekly and deeper solution cleaning every two to four weeks. Dogs with floppy ears, allergies, or who swim frequently may need more frequent cleaning. Healthy ears with no visible debris may need cleaning less often. Your veterinarian can recommend a schedule for your specific dog.
Why can I use my finger but not a Q-tip?
Your finger is too large to navigate the 90 degree bend in your dog's L shaped ear canal. It physically cannot reach the eardrum or push debris past the bend. Cotton swabs are thin enough to navigate that curve, allowing them to push debris deeper, scratch the ear canal, or even puncture the eardrum.
What is the difference between ear wipes and ear solution?
Ear wipes (finger sleeve style) are pre moistened wipes you wear on your finger to clean the accessible portions of the ear. They are convenient for regular maintenance. Ear solution is a liquid you pour into the ear canal that reaches the deeper horizontal portion where your finger cannot go. Solution is better for deeper cleaning and for dogs with significant buildup.
Can I use human ear cleaning products on my dog?
No. Dogs' ears have a different pH than human ears. Human ear products are not formulated for canine ear anatomy and chemistry. Always use products specifically formulated for dogs.
My dog hates having their ears cleaned. What should I do?
Go slowly and build positive associations. Start by just touching their ears and rewarding with treats. Gradually progress to lifting the ear flap, then showing them the cleaning supplies, then very brief cleaning. Never force the process. Some dogs do better with one person distracting with treats while another person cleans.
How do I know if my dog has an ear infection?
Signs include redness, swelling, unusual or foul odour, discharge (especially dark or coloured discharge), excessive head shaking, scratching at the ears, pain when the ear is touched, and changes in behaviour. If you notice any of these signs, see your veterinarian before attempting to clean the ears at home.
Should I clean my dog's ears after swimming?
Yes. Water in the ear canal creates moisture that encourages bacterial and yeast growth. Using an ear cleaning solution with a drying agent after swimming helps remove water and prevent infection.
What does healthy ear wax look like?
Normal, healthy ear wax is light tan to brownish in colour. Small amounts are normal. Dark brown, black, or unusually coloured discharge, discharge with a strong odour, or excessive amounts of discharge may indicate a problem.
Can I clean my dog's ears too often?
Yes. Over cleaning can irritate the ear canal and disrupt the natural balance of the ear environment. Clean based on what you observe. If ears are healthy with minimal debris, you do not need to clean frequently. Clean when you see visible wax or debris, after swimming, or on a schedule recommended by your veterinarian.
How deep can I safely go when cleaning my dog's ears?
With your finger (wrapped in cotton or a wipe), you can safely go about one knuckle deep. Your finger physically cannot go deeper than this because the L shaped canal and 90 degree bend prevent it. Never try to force anything deeper.
What should I avoid when cleaning my dog's ears?
Avoid cotton swabs (Q-tips), products containing alcohol or hydrogen peroxide, forcing the cleaning bottle tip deep into the ear, cleaning when signs of infection are present, and cleaning so frequently that you cause irritation.
My dog's ears smell bad but look clean. Is that a problem?
Yes. A strong or unusual odour from the ears, even without visible discharge, often indicates an infection brewing. See your veterinarian for evaluation.
Can ear cleaning prevent ear infections?
Regular cleaning helps reduce the conditions that lead to infection by removing debris and excess moisture. However, dogs with underlying allergies or anatomical issues may still develop infections despite regular cleaning. Cleaning is part of prevention but not a guarantee.
What do ear mites look like?
Ear mites often produce a dark, crumbly discharge that looks like coffee grounds. Dogs with ear mites typically shake their heads and scratch their ears intensely. If you suspect ear mites, see your veterinarian. They require specific treatment.
Should I pluck hair from my dog's ear canal?
This depends on your dog and your veterinarian's recommendation. Some dogs with hairy ear canals benefit from having excess hair plucked to improve airflow. Others do better leaving the hair alone. Improper plucking can cause irritation. Discuss this with your veterinarian or professional groomer.
What is the difference between the two Wellmark ear cleaning solutions?
The Wellmark Ear Cleaning and Drying Solution contains higher alcohol content (10 percent Ethanol) and is designed to clean and dry the ear canal, making it ideal after baths and swimming. The Wellmark pH Balanced Ear Cleaning Solution contains less alcohol (less than 1 percent Ethanol) and is gentler for routine weekly maintenance on healthy ears. Both are veterinary-grade Canadian formulations.
Where does ear cleaning fit in the FurHQ 5-Step?
The Audit checks ear condition. The Prep phase handles light wipe cleaning. After the Bath phase, apply Wellmark Ear Cleaning and Drying Solution to remove moisture. The Dry phase ensures ears are thoroughly dried. The Finish phase confirms ears are clean, dry, and healthy.
Are FurHQ Ear Wipes included in every kit?
Yes. FurHQ Ear Wipes are included in every FurHQ Starter Grooming Kit across all seven coat types. Wellmark ear cleaning solutions are available separately in the FurHQ Store for deeper cleaning needs.