
How to Trim Dog Nails - Clippers and Grinders Step by Step
Table of Contents
- Introduction
- Where Nail Trimming Fits in the FurHQ 5-Step
- Clippers vs Grinders: Which Tool Is Right for Your Dog
- Understanding the Quick: The Key to Safe Nail Trimming
- What to Do If You Cut the Quick
- How to Hold Your Dog's Paw: Proper Positioning
- How to Trim Dog Nails with Clippers: Step by Step
- How to Trim Dog Nails with a Grinder: Step by Step
- The Combination Method
- How Often to Trim
- Troubleshooting
- Your Energy Matters: Dogs Feel What You Feel
- When to See a Professional
- The FurHQ Nail Mastery Kit
- Related Reading
- The Bottom Line
- Variation Clarity Statement
- FAQs
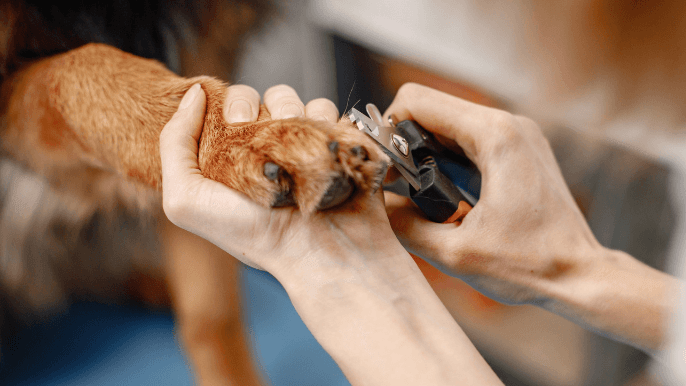 Introduction
How to trim dog nails is one of the most important grooming skills you can develop as a pet parent. Long nails cause real problems: discomfort when walking, splayed toes, altered gait, joint strain, and in severe cases, nails that curl and grow into the paw pad. Yet nail trimming remains the grooming task most pet parents dread.
Here is the truth: how to trim dog nails is not complicated. The mechanics are straightforward. What makes it feel difficult is fear of hurting your dog, lack of confidence in your technique, and dogs who have learned to dread the process. All three of these problems are solvable.
This guide covers everything you need to know about how to trim dog nails at home. You will learn the difference between clippers and grinders, how to hold your dog's paw correctly, how to identify the quick (even in black nails), and step-by-step technique for both tools.
Where Nail Trimming Fits in the FurHQ 5-Step
Nail trimming integrates into the FurHQ Protocol: A 5-Step Grooming Method as part of a complete grooming session.
During the Audit: Check nail length on all four paws including dewclaws. If nails click on hard floors, touch the ground when standing, or are starting to curve, they need trimming. Note any cracked, split, or damaged nails that may need special attention.
During the Prep phase: Nail trimming is typically done during the Prep phase before the bath. Trimming nails before bathing means you can see the nails clearly without wet fur in the way, and any minor quick nicks can be addressed before the dog gets wet.
During the Bath phase: Not applicable. Nails are already trimmed.
During the Dry phase: Not applicable.
During the Finish phase: Do a final nail check. Confirm all nails are trimmed to appropriate length, edges are smooth (file or grind any sharp edges missed during Prep), and no nails were overlooked including dewclaws. Run your hand down each leg and over the paws as part of the final assessment.
Clippers vs Grinders: Which Tool Is Right for Your Dog
Before learning how to trim dog nails, you need to choose your tool. Both clippers and grinders work well. The best choice depends on your dog's tolerance, your comfort level, and your dog's nail type.
Nail Clippers
Clippers cut through the nail in one motion. Scissor-style clippers work like scissors with curved blades and provide good visibility and control, especially for thick nails on large dogs. Guillotine-style clippers have a hole where you insert the nail and a blade that slides across. Plier-style clippers combine elements of both designs and offer strong cutting power.
Advantages: Fast, no noise or vibration to desensitise, battery-free, lower initial cost.
Disadvantages: Risk of cutting too much in one clip, can leave sharp edges, dull blades crush rather than cut, the clip sensation bothers some dogs.
Nail Grinders
Grinders use a rotating sanding drum or disc to file the nail down gradually. Pet-specific grinders are designed for dog nails with protective guards and quieter motors. Rotary tools offer more power and variable speeds.
Advantages: Gradual removal reduces risk of hitting the quick, leaves smooth rounded edges, better control, easier on black nails, many dogs tolerate the sensation better.
Disadvantages: Noise and vibration require desensitisation, generate heat with prolonged contact, take longer, can catch long fur.
Which Should You Choose
Choose clippers if your dog is comfortable with nail trimming, you want efficiency, or your dog is sensitive to noise. Choose a grinder if your dog has black nails, you want more control, your dog dislikes clipping pressure, or you are nervous about cutting too short. Or use both: clip the bulk of the nail, then smooth and round the edges with a grinder.
Understanding the Quick: The Key to Safe Nail Trimming
The quick is the living part of the nail containing blood vessels and nerves. Cutting into the quick causes pain and bleeding. Understanding how to trim dog nails safely means understanding where the quick ends.
In Light-Coloured Nails
Light or white nails make the quick visible. Look at the nail from the side. You will see a pink area inside the nail extending from the base partway down. The white or clear portion beyond the pink is dead nail that can be safely trimmed. Safe trimming zone: trim the white portion only, staying 2 to 3 millimetres away from where the pink begins.
In Dark or Black Nails
Black nails hide the quick completely. Learning how to trim dog nails with dark nails requires a different approach.
The cut surface method: Trim a very small amount (1 to 2 millimetres) and look at the freshly cut surface head on. Whitish, flaky nail at first means safe to continue. Grey or tan colour means proceed with caution. A dark dot or oval in the centre means stop immediately, this is the quick.
The underside method: Look at the underside of the nail. Where the nail starts to separate into a triangular shape with two outer walls, the quick begins above that point.
The flashlight method: Shine a bright flashlight behind the nail. Sometimes the quick's shadow becomes visible even in dark nails.
What to Do If You Cut the Quick
Even experienced groomers occasionally cut the quick. Stay calm. Apply styptic powder directly to the nail and press firmly for 30 seconds. If you do not have styptic powder, use cornstarch or flour. Keep pressure on the nail until bleeding stops (usually 5 to 10 minutes). Keep your dog calm and still. Avoid letting your dog lick the nail. Give your dog a break before continuing or stop for the day. Prevention: Keep styptic powder within reach before every session.
How to Hold Your Dog's Paw: Proper Positioning
How you hold your dog's paw affects their comfort, your control, and your ability to see what you are doing. Learning how to trim dog nails starts with mastering the paw hold.
The Basic Paw Hold
For front paws: Face the same direction as your dog. Reach under and around to lift the paw backward, similar to how a farrier holds a horse's hoof. Rest the paw in your palm with the paw pad facing up toward you. Your thumb should be on top of the paw near the toes. Gently press on individual toes to extend each nail.
For rear paws: Have your dog stand or lie on their side. Lift the rear paw backward and up slightly. Support the leg at the ankle area. Rest the paw in your palm with good visibility of the nails.
The Toe Isolation Hold
Use your thumb and forefinger to hold a single toe. Apply gentle pressure to the toe pad to extend the nail. Push any fur away from the nail for clear visibility. Keep the other toes out of the way. This prevents accidentally cutting the wrong nail and gives you maximum control.
Positioning Your Dog
Standing position works well for confident dogs and experienced trimmers. Lying on side is good for wiggly or anxious dogs. In your lap works for small dogs. On an elevated surface like a grooming table can make nail trimming easier by bringing the dog to a comfortable working height.
Avoid pulling the paw away from your dog's body, squeezing too hard, holding the paw at an unnatural angle, rushing through positioning, or continuing if your dog is showing significant stress signals.
How to Trim Dog Nails with Clippers: Step by Step
Before You Begin
Gather your supplies: sharp nail clippers appropriate for your dog's size, styptic powder, high-value treats, good lighting, non-slip surface. The FurHQ Nail Mastery Kit includes clippers, a grinder, and styptic powder along with video training and PDF guides.
Check your clippers: Dull clippers crush the nail rather than cutting cleanly. This is painful and can split the nail.
The Clipping Technique
Step 1: Position your dog and paw. Get your dog comfortable. Pick up the first paw using the basic paw hold.
Step 2: Isolate the first toe. Use your thumb and forefinger to hold a single toe. Press gently on the pad to extend the nail. Move any fur out of the way.
Step 3: Identify your cut line. For light nails, visualise where the pink quick ends and plan to cut 2 to 3 millimetres beyond it. For dark nails, plan to take only 1 to 2 millimetres.
Step 4: Position the clippers. Hold at a 45-degree angle to the nail, cutting from bottom to top. For guillotine clippers, insert the nail through the hole with the cutting blade facing you. For scissor or plier style, position blades perpendicular to the nail at 45 degrees.
Step 5: Make the cut. Squeeze the handles in one smooth, decisive motion. Hesitating or squeezing slowly can crush the nail.
Step 6: Examine the cut surface. Look at the freshly cut nail head on. White, flaky nail means you can trim more. Grey or a dark centre dot means stop.
Step 7: Reward and move on. Treat. Move to the next nail.
Step 8: Smooth if needed. Use a nail file or grinder briefly to round sharp edges.
Tips: Trim only the hook (the curved tip past the quick). When in doubt, trim less and trim more often. One nail per session is acceptable for anxious dogs. The more frequently you trim, the more the quick recedes.
How to Trim Dog Nails with a Grinder: Step by Step
Before You Begin
Gather your supplies: nail grinder with charged battery, styptic powder, high-value treats, hair tie to secure long fur if needed. Choose your speed setting: low for maintenance and sensitive dogs, high for faster removal. For rotary tools, 10,000 to 15,000 RPM is appropriate.
If your dog has never experienced a grinder, work through desensitisation first.
The Grinding Technique
Step 1: Position your dog and paw. Get comfortable. Pick up the first paw.
Step 2: Isolate the first toe. Hold a single toe, extend the nail.
Step 3: Secure any long fur. Long fur can wrap around the spinning grinder. Push fur back or secure with a hair tie.
Step 4: Support the nail. Place your thumb or finger against the nail to reduce vibration transmitted to the toe.
Step 5: Turn on the grinder. Turn on before touching it to the nail. Do not turn it on while already in contact.
Step 6: Apply the grinder in short touches. This is the key to how to trim dog nails with a grinder: tap, tap, tap. Touch the grinder to the nail for 1 to 3 seconds maximum, then lift away. Repeat. Do not hold the grinder against the nail continuously. Friction creates heat.
Step 7: Work at a 45-degree angle. Grind the bottom of the nail first, then round the top and sides. Work in small increments all around.
Step 8: Check progress frequently. Stop every few seconds. Look for the dark centre dot indicating you are approaching the quick.
Step 9: Alternate nails to prevent heat buildup. Rotate between nails on the same paw, giving each time to cool.
Step 10: Reward throughout. Treats between nails or between paws.
Dewclaws (the thumb nails on the inner leg) can be harder to reach. Remove the grinder guard if needed. Dewclaws do not wear down naturally and often need more frequent attention.
The Combination Method
Many experienced pet parents use both tools together. This is the most efficient way to learn how to trim dog nails to a professional standard.
Step 1: Clip the bulk. Use clippers to remove the main hook. Faster than grinding the entire length.
Step 2: Grind to finish. Switch to the grinder to smooth edges, round the tip, and fine-tune the length. The grinder lets you approach the quick more gradually.
Benefits: Faster than grinding alone, more precise than clipping alone, leaves perfectly smooth rounded nails, reduces risk of cutting the quick while being efficient.
How Often to Trim
Knowing how to trim dog nails includes knowing when. Frequency depends on activity level and the surfaces your dog walks on.
General guideline: Every 2 to 4 weeks for most dogs.
Signs nails are too long:
- Clicking on hard floors
- Nails touching the ground when standing
- Nails starting to curve or hook
- Toes spreading or splaying
Dogs needing more frequent trimming: Senior dogs with reduced activity, indoor dogs, dogs with fast-growing nails, dogs whose quicks have grown long.
Dogs needing less frequent trimming: Active dogs who walk on pavement or concrete daily, working dogs with high activity levels.
Troubleshooting
My dog will not let me touch their paws. This requires desensitisation before you attempt trimming. Work on paw handling separately. Touch the paw briefly, treat. Hold the paw, treat. Press on toes, treat. Build up over days or weeks.
My dog panics at the sight of clippers. Your dog has learned to associate clippers with a negative experience. Keep clippers out where your dog can see them. Treat near the clippers. Touch clippers to paw without cutting, treat. Rebuild trust gradually.
The nails are severely overgrown. Trim just the very tip (1 to 2 millimetres) every few days. The quick will gradually recede, allowing you to cut shorter over time. This process takes weeks but is safer than cutting long nails short immediately.
My dog is fine for the first few nails then fights. Your dog is reaching their tolerance limit. Respect it. End the session before they reach that point next time. Better to do three nails calmly than fight through all nails.
The grinder seems to take forever. Check your sanding band (worn bands are ineffective). Check your speed setting. Make sure you are applying appropriate pressure.
I keep cutting the quick. Take smaller amounts. For dark nails, cut 1 to 2 millimetres maximum and examine after every single cut. Consider switching to a grinder for more control.
Your Energy Matters: Dogs Feel What You Feel
Here is something most nail trimming guides do not tell you: your emotional state directly affects your dog's experience. Dogs are experts at reading human energy. They sense your tension, anxiety, and fear even when you think you are hiding it.
If you approach nail trimming feeling nervous, rushed, or dreading the task, your dog absorbs that energy. Your stress becomes their stress. That negative association can imprint on your dog without you even realising it.
Signs you might be transferring stress: holding your breath while trimming, shaking hands or gripping too tightly, racing heart, tensing shoulders and jaw, rushing to get it over with.
The honest truth: if you cannot approach nail trimming calmly, it is better to leave this task to a professional. This is not failure. This is self-awareness that protects your dog. A groomer or veterinary technician who trims nails confidently every day brings calm, neutral energy. Professional nail trims done calmly are far better for your dog than home nail trims done with anxiety, even if your technique is perfect.
If you want to learn: practise calming yourself before picking up the tools. Take slow, deep breaths. Relax your shoulders. Check your grip. If you notice tension building, stop. One nail done calmly is better than four nails done while stressed.
When to See a Professional
Learning how to trim dog nails at home is valuable, but some situations call for professional help.
See a groomer or veterinarian if nails are severely overgrown and curling into pads, your dog is aggressive during nail trimming (not just anxious but actively trying to bite), you have tried desensitisation for weeks without progress, your dog has a nail injury or infection, or you are not comfortable despite practice.
Professional groomers who know how to trim dog nails quickly and efficiently bring calm energy. Having a professional handle the task is a perfectly valid choice, especially for dogs with severe anxiety.
The FurHQ Nail Mastery Kit
If you want everything you need to master how to trim dog nails at home, the FurHQ Nail Mastery Kit has you covered. The kit includes: nail clippers (professional quality, sized for your dog), nail grinder (for smoothing edges and gradual shortening), styptic powder (essential for stopping bleeding if you accidentally cut the quick), video training (step-by-step demonstrations of proper paw holds and technique), and PDF guides (printable reference materials). Available in the FurHQ Store.
Not sure which kit matches your dog? Use the FurHQ Breed Selector or the FurHQ AI Coat Identifier to find your match.
Related Reading
The Bottom Line
Learning how to trim dog nails is a skill that improves with practice. The first few times may feel awkward. You may only get through a few nails before your dog (or you) needs a break. That is completely normal and acceptable.
What matters is that you start. Take it slow. Prioritise your dog's comfort over completing all nails in one session. Build positive associations with treats and patience. Within the FurHQ 5-Step, the Audit checks nail length, the Prep phase handles trimming before the bath, and the Finish phase confirms all nails are properly trimmed with smooth edges.
Keep nails short enough that they do not click on the floor. Trim frequently so the quick stays short. Use whichever tool works best for you and your dog. And remember that asking for professional help when you need it is not failure.
Learn the Method. Follow the Protocol. Complete the Mission.
Variation Clarity Statement
Every dog is an individual. Nail growth rate, quick length, sensitivity, and tolerance for nail trimming vary even within the same breed. The information in this blog represents general guidance. Your dog's specific needs may require adjustments to frequency, tool choice, or technique. Dogs with nail injuries or chronic nail problems should follow their veterinarian's specific guidance. When in doubt, consult your veterinarian or a Certified Professional Groomer. If you are unsure about your dog's coat type, use the FurHQ AI Coat Identifier to get accurate identification and the right kit recommendation.
FAQs
What are FurHQ Coat Types?
FurHQ classifies dog coats into seven categories to match you with the right tools and techniques:
- Curly Wavy Coat (single coated)
- Wire Coat (double coated)
- Drop Coat (single coated)
- Smooth Single Coat
- Short Double Coat
- Medium Plush Double Coat (1 to 3 inches)
- Feathered Long Double Coat (3 plus inches)
Some dogs may fit multiple categories. Use the FurHQ AI Coat Identifier if you are unsure.
Can dogs really sense human emotions?
Yes. Research confirms dogs detect human emotions through smell (stress hormones change body odour), sight (dogs read facial expressions), hearing (dogs interpret tone of voice), and body language. Dogs not only detect these emotional signals but respond to them and often mirror them.
How do I know if my stress is affecting my dog during grooming?
Watch for your dog becoming tense when you become tense, resistance increasing when you feel frustrated, and your dog anticipating grooming negatively before it even starts. If your dog is calm with professional groomers but difficult with you, your energy is likely part of the equation.
What if I am always anxious about grooming?
If you consistently feel anxious about grooming despite practice and preparation, consider leaving some or all grooming tasks to professionals. This is not failure. It is self awareness that protects your dog from absorbing your anxiety.
Can I undo negative associations my dog has already formed?
Yes, but it takes time and consistency. You need to bring calm energy to many short, positive sessions to overwrite negative associations. The process may take weeks or months. Consider working with a fear free certified groomer to help reset your dog's expectations.
Why does my dog act differently with the groomer than with me?
Professional groomers bring calm, confident energy because grooming is routine for them. Your dog mirrors that calm. At home, if you bring anxiety or uncertainty, your dog mirrors that instead. The difference is often the human's energy, not the dog's behaviour.
How can I calm myself before grooming?
Take slow, deep breaths. Consciously relax your shoulders, jaw, and face. Prepare all tools beforehand so you do not feel rushed. Create a time buffer so there is no pressure. Check your emotional state honestly and postpone if you are not calm.
Is it okay to stop grooming if I start feeling stressed?
Absolutely. Stopping when you feel stress rising is better than pushing through and transferring that stress to your dog. You can always finish later when you are calm. Your dog learns more from one calm session than three stressful ones.
Why do grooming sessions seem to get worse over time?
This often happens because of negative imprinting. Each stressful session reinforces the association between grooming and stress for both you and your dog. Breaking this cycle requires consistently calm sessions to build new, positive associations.
Should I hide my anxiety from my dog?
Dogs are too perceptive for you to hide anxiety effectively. They smell stress hormones, read micro expressions, and feel tension in your body. Rather than trying to hide anxiety, focus on genuinely reducing it through preparation, breathing, and realistic expectations.
Can my dog make me stressed during grooming?
Yes, emotional contagion works both directions. If your dog is anxious, you may absorb their anxiety. However, research suggests the primary direction of influence is from owner to dog. Regulating your own state first is usually the most effective approach.
What if only certain grooming tasks make me anxious?
It is completely acceptable to handle tasks you feel calm about and outsource tasks that make you anxious. Many owners brush and bathe at home but have professionals handle nail trimming. Mix and match based on where you can bring genuine calm.
How long does it take to change my dog's grooming associations?
This depends on how strongly negative associations are established. For mild associations, you may see improvement in a few weeks. For deeply ingrained negative associations, expect two to three months or more of consistent calm sessions.
Does my energy matter even if I use treats during grooming?
Yes. Treats help create positive associations, but they cannot fully override the negative impact of anxious energy. A treat paired with owner anxiety creates a mixed message. A treat paired with owner calm creates a clear positive association.
What if my dog has always been difficult during grooming?
Consider whether "always" started before or after they experienced grooming with an anxious human. Many dogs labeled as difficult were actually responding to human energy from the start. Changing your energy can sometimes transform a "difficult" dog.
What is the FurHQ 5-Step Grooming Method?
The FurHQ 5-Step Grooming Method is Audit, Prep, Bath, Dry, Finish. It provides structure for every grooming session so nothing gets missed. The Audit assesses the coat and body before you start. The Prep phase removes loose coat and addresses tangles. The Bath phase handles cleansing. The Dry phase removes moisture. The Finish phase completes the groom with a final assessment and comb check.